
FitnessHub
-
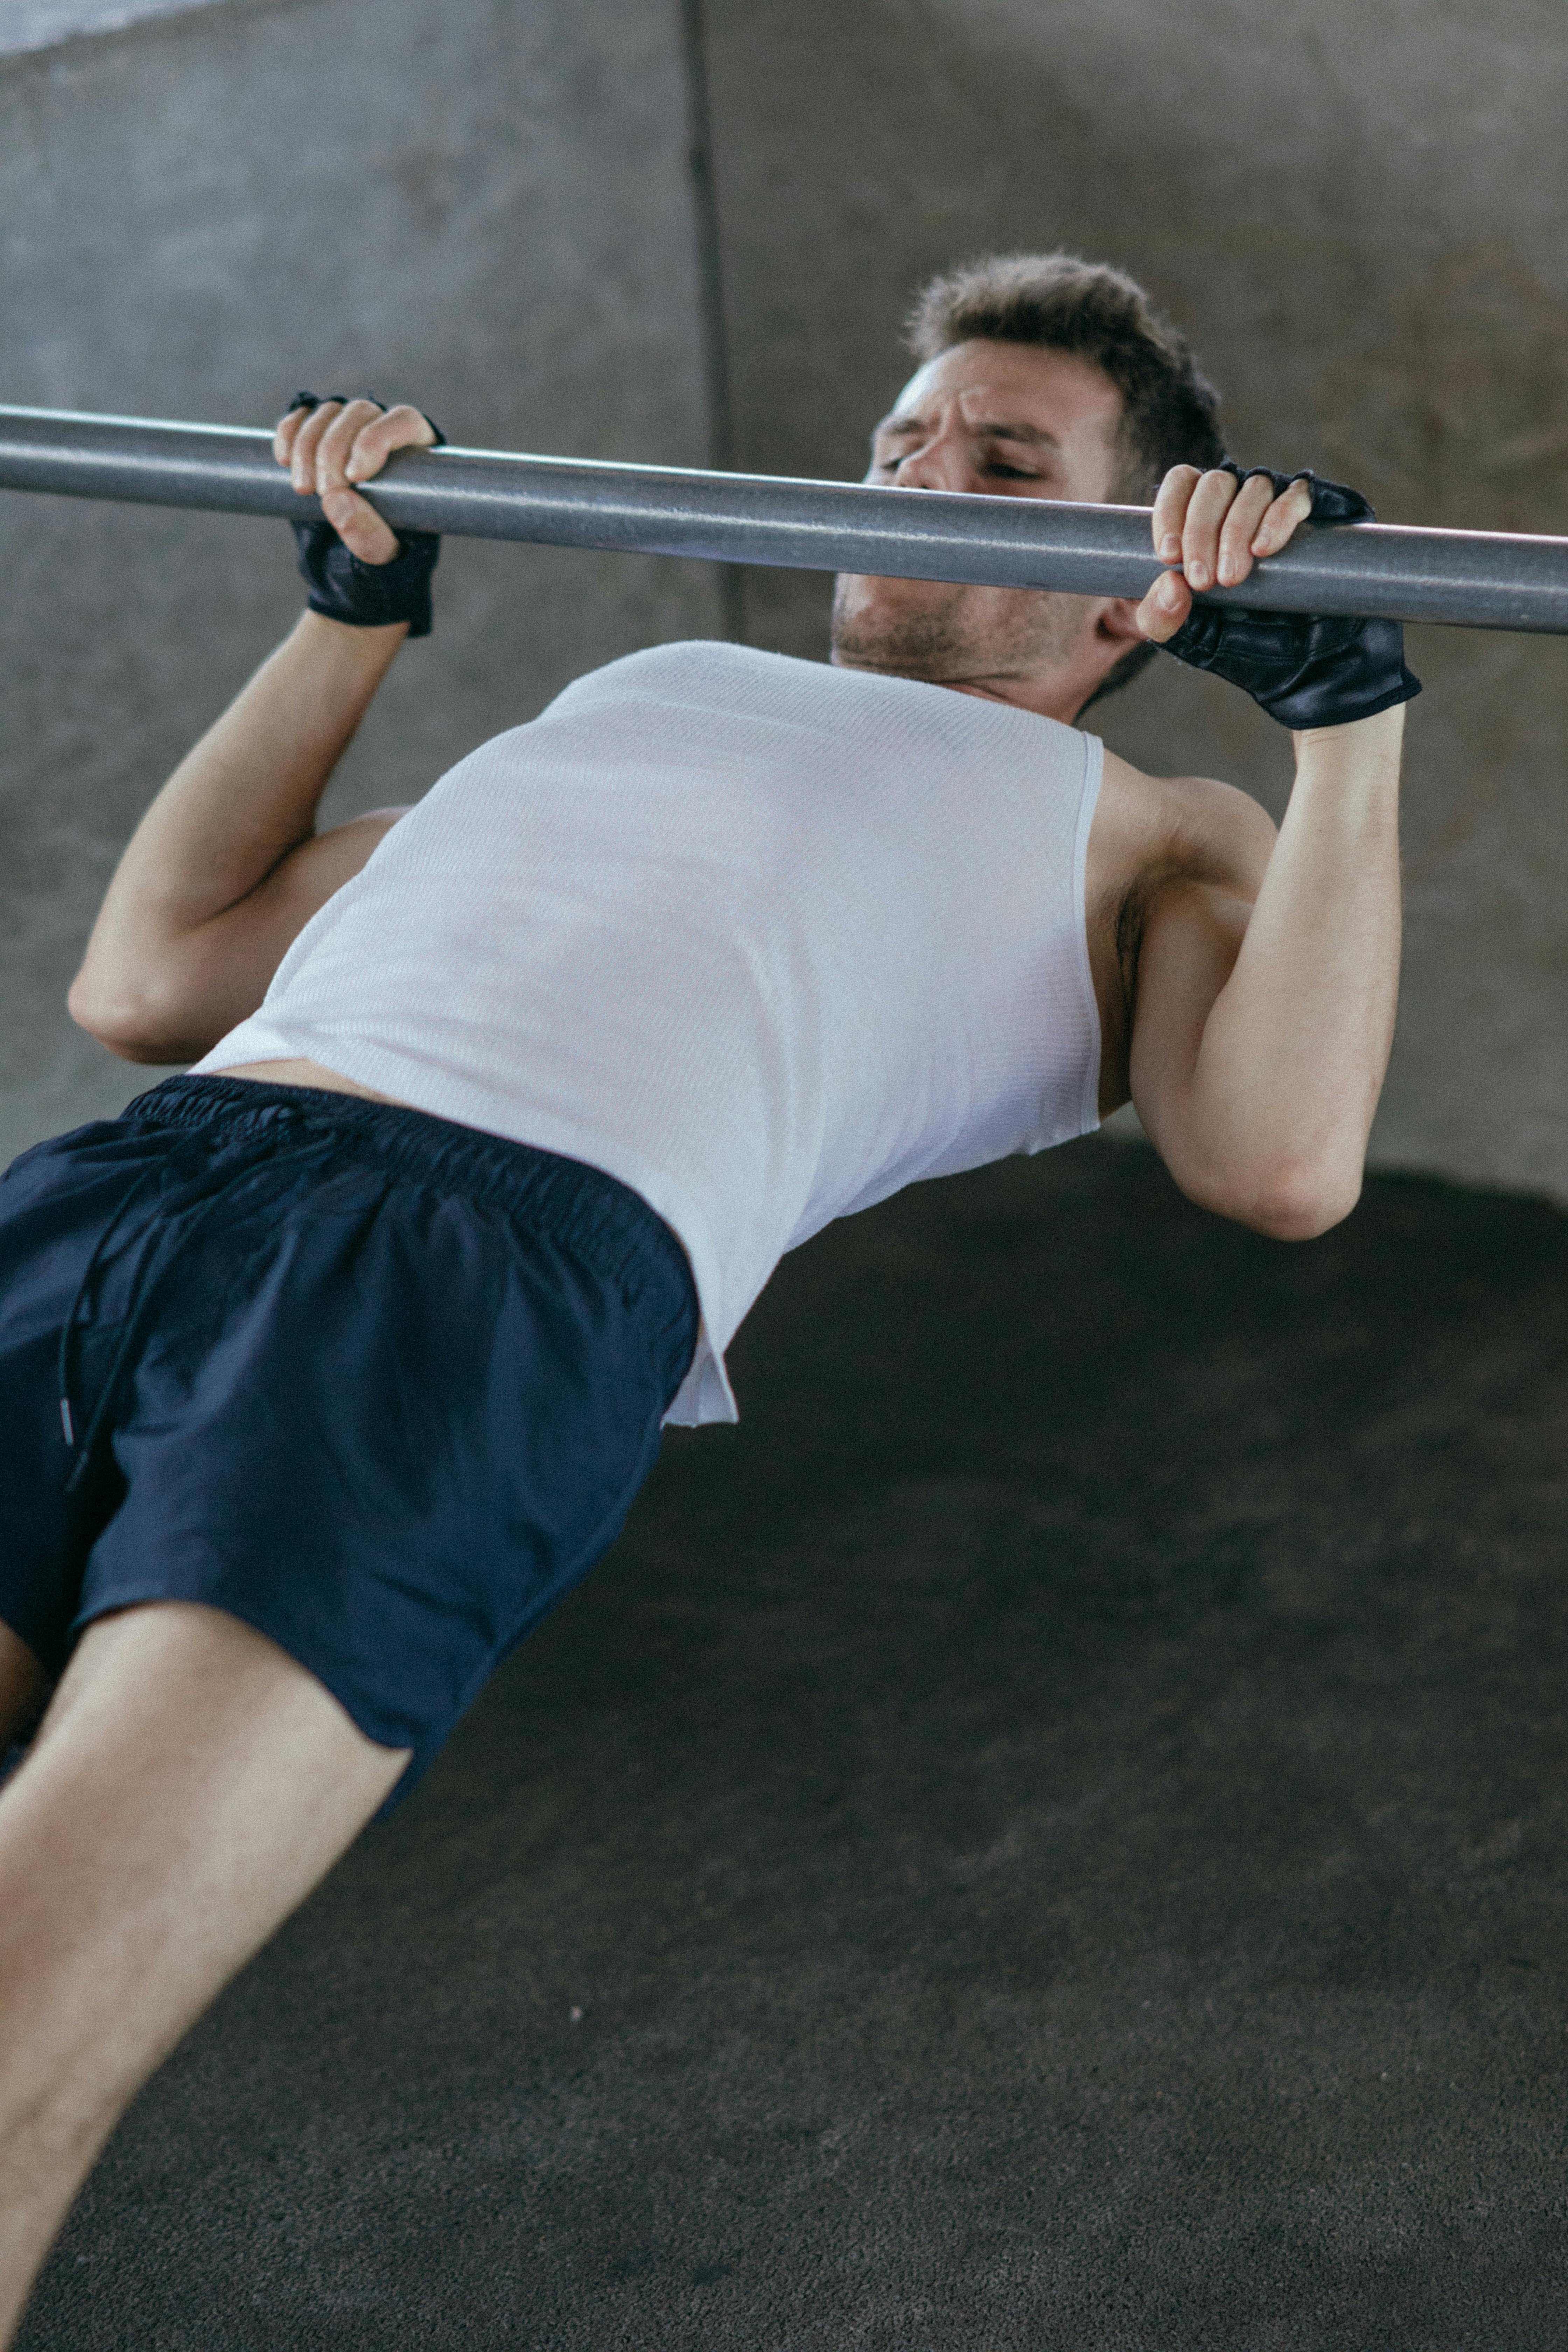
 Handstand Push-Up | Muscles Worked, Benefits & Progression Handstand Push-Up Complete Guide: Muscles Worked, Benefits...
 -
 DEEP SQUAD EXERCISE....deep squad exercise Smith machine squats are a variation of traditional squats performed using a Smith ma...
 -
 A decline push-up is a variation of the traditional push-up that targets the upper chest and shoulders more intensely. Here's how it ...
Thursday, July 30, 2026
leg extension machine
Commercial Leg Extension Machine
The Leg Extension Machine is one of the most effective strength training machines designed to isolate and strengthen the quadriceps muscles. Whether you operate a commercial fitness center, professional gym, rehabilitation facility, or home gym, this machine provides smooth resistance, ergonomic comfort, and exceptional durability for users of all fitness levels. or One of the most popular leg machines See Alsoin the gym is the leg extension machine; it allows you to extend your legs upwards, causing the cable mechanism to move in a way that ensures you feel the load directly on the target muscles while exercising.

Product Overview
The Leg Extension Machine is a popular strength-training machine designed to isolate and strengthen the muscles at the front of your thighs, known as the quadriceps. It is commonly found in commercial gyms, fitness centers, and even home gyms because of its simple design and effectiveness. Whether you are a beginner starting your fitness journey or an experienced athlete, this machine can help improve lower-body strength, muscle definition, and knee stability.
Using the leg extension machine is straightforward. You sit comfortably on the padded seat, place your lower legs behind the padded roller, and extend your knees until your legs are almost straight. The movement specifically targets the quadriceps while minimizing the involvement of other lower-body muscles. This makes it an excellent exercise for building muscle, improving leg symmetry, and recovering strength after certain injuries when performed under professional guidance.
One of the biggest advantages of the leg extension machine is its adjustable settings. Most machines allow users to adjust the seat position and weight resistance according to their height and fitness level. This ensures proper body alignment and helps reduce the risk of injury while maximizing workout effectiveness.
The leg extension machine is widely used by bodybuilders, athletes, runners, and fitness enthusiasts to increase leg strength, improve sports performance, and enhance muscle definition. It is also commonly included in lower-body workout See Also routines alongside exercises like squats, lunges, and leg presses.
For the best results, use controlled movements instead of swinging the weight. Avoid locking your knees at the top of the movement, and choose a weight that allows you to maintain proper form throughout the exercise. Performing 3–4 sets of 10–15 repetitions is generally suitable for muscle growth and endurance, depending on your fitness goals.
Overall, the leg extension machine is a safe, beginner-friendly, and highly effective piece of gym equipment that helps build stronger, more defined quadriceps while supporting better lower-body performance and overall leg strength.

Key Features
- Heavy-duty commercial steel frame
- Powder-coated corrosion-resistant finish
- Smooth and silent movement
- Ergonomic seat and backrest
- High-density foam cushioning
- Adjustable leg roller pads
- Anti-slip rubber feet
- Premium bearings for smooth operation
- Suitable for commercial and home gyms
- Low maintenance design
The leg extension machine is built with a heavy-duty commercial-grade steel frame that provides exceptional strength, stability, and durability. This robust construction allows the machine to withstand intense daily workouts and heavy weight loads. It ensures long-term performance, making it suitable for both professional fitness centers and serious home gym users.
A premium powder-coated finish protects the machine from rust, corrosion, scratches, and daily wear. This protective coating helps maintain the machine’s appearance and structural integrity even in humid gym environments. The durable finish extends the equipment's lifespan while providing a clean, professional look for years of reliable use.
The machine is engineered to provide smooth and quiet operation throughout every repetition. Advanced mechanical components reduce friction and vibration, allowing users to focus on their workout without distractions. This silent performance enhances comfort, improves exercise efficiency, and creates a more enjoyable training experience in any fitness environment.
Designed with user comfort in mind, the ergonomic seat and backrest provide excellent support during workouts. The contoured design promotes proper posture and spinal alignment, helping reduce strain on the lower back. This feature allows users to perform leg extension exercises safely, comfortably, and with maximum muscle engagement.
The machine features premium high-density foam padding that offers superior comfort and support during training sessions. The cushioning maintains its shape even after prolonged use, reducing pressure on the body. This ensures a comfortable workout experience while helping users focus on performance rather than discomfort or fatigue
Adjustable leg roller pads allow users of different heights and body types to achieve the correct exercise position. Proper adjustment ensures optimal muscle activation chest muscle activation see also, comfort, and safety during each repetition. This customizable feature makes the machine versatile and suitable for a wide range of users and fitness levels
Equipped with anti-slip rubber feet, the machine remains stable and secure during intense workouts. These rubber supports prevent unwanted movement, protect flooring from damage, and reduce vibrations. Enhanced stability increases user confidence and safety, ensuring a solid foundation for effective strength-training sessions.
High-quality precision bearings ensure consistent and fluid movement throughout the exercise range. These bearings minimize resistance, reduce wear on moving parts, and improve overall machine performance. The result is a smoother workout experience, greater durability, and reliable operation even under frequent and demanding use.
The versatile design makes this leg extension machine ideal for both commercial fitness facilities and home gym setups. Its durable construction, user-friendly features, and compact footprint cater to a variety of training environments. Whether for personal fitness goals cardio exercise planor professional use, it delivers excellent performance and reliability.
The machine is designed with low-maintenance components that require minimal upkeep over time. Durable materials, corrosion-resistant surfaces, and high-quality moving parts reduce the need for frequent repairs or servicing. This saves time and maintenance costs while ensuring dependable performance and long-lasting functionality.
Benefits of Leg Extension Machine
- Build stronger quadriceps muscles
- Improve lower body strength
- Enhance athletic performance
- Increase knee joint stability
- Support rehabilitation exercises
- Improve muscle definition
- Reduce muscle imbalance
leg extension exercise workout
Technical Specifications
| Feature | Specification |
|---|---|
| Frame Material | Heavy Duty Steel |
| Finish | Powder Coated |
| Seat | High Density Cushion |
| Resistance | Weight Stack / Plate Loaded |
| Usage | Commercial Gym |
| Color | Custom Available |
Applications
The Leg Extension Machine is widely used in:
- Commercial Gyms
- Fitness Centers
- Health Clubs
- Hotels
- Sports Academies
- Rehabilitation Centers
- Home Gyms
Why Choose Our Leg Extension Machine?
Our commercial-grade Leg Extension Machine is engineered for long-lasting performance, maximum user comfort, and precise muscle isolation. Every component is manufactured under strict quality standards to ensure durability, safety, and superior workout performance. Its ergonomic design allows users to perform controlled leg extension exercises efficiently while reducing unnecessary joint stress.
Maintenance Tips
- Clean the machine regularly.
- Inspect moving parts periodically.
- Lubricate bearings if required.
- Tighten bolts regularly.
- Keep the machine dry.
Frequently Asked Questions (FAQs)
What muscles does the Leg Extension Machine target?
The machine primarily targets the quadriceps muscles located at the front of the thigh.
Is this machine suitable for commercial gyms?
Yes. It is specifically designed for heavy commercial use.
Can beginners use this machine?
Absolutely. The adjustable settings make it suitable for beginners as well as advanced athletes.
Does it require regular maintenance?
Only minimal maintenance such as cleaning, inspection, and occasional lubrication is required.
Tuesday, July 21, 2026
15 Best Upper Back Exercises Gym for Muscle Growth
15 Best Upper and lower Back Exercises Gym for Muscle Growth
A strong upper back improves posture, enhances pulling strength, supports shoulder health, and creates a wider, more muscular physique. Add these exercises to your workout routine to target the trapezius, rhomboids, rear deltoids, and upper lats for balanced muscle growth.
1. Lat Pulldown
The lat pulldown is one of the key exercises for the back; it is considered an excellent choice for training the upper back. As the name suggests, this exercise targets the lats (latissimus dorsi) by pulling a bar downwards.

The lat pulldown is one of the most effective upper back exercises for building width and strength. Sit with your thighs secured, grip the bar slightly wider than shoulder-width, and pull it toward your upper chest. Squeeze your shoulder blades together before slowly returning the bar. Focus on controlled movement
The Lat Pulldown primarily targets the Latissimus Dorsi (Lats), but the emphasis on specific areas of the lats can shift depending on the grip and technique used.
Which parts of the lats are activated during a Lat Pulldown?
1. Upper Lats (Outer Lats) – ⭐⭐⭐⭐⭐ Primary
These experience the highest level of activation.
A wide-grip lat pulldown places greater tension on the outer lats.
It helps in building a V-shaped back.
2. Middle Lats – ⭐⭐⭐⭐☆
Good activation is achieved when pulling the bar down to the upper chest.
It improves both the thickness and width of the back.
3. Lower Lats – ⭐⭐⭐☆☆
The lower lats are engaged during a standard lat pulldown, though to a comparatively lesser extent.
Close-grip or neutral-grip lat pulldowns and straight-arm pulldowns target the lower lats more effectively.
Secondary Muscles
The lat pulldown involves not just the lats; the following muscles also assist in the movement:
1 Teres Major
2 Rhomboids
3 Middle & Lower Trapezius
4 Rear Deltoids
5 Biceps Brachii
6 Brachialis
7 Forearms (Grip)
2.Seated Cable Row
The Seated Cable Row is one of the most effective compound exercises for the upper and middle back. It is considered an excellent exercise for increasing back thickness.
The seated cable rowdevelops thickness across the upper and middle back. Sit upright, keep your chest lifted, and pull the handle toward your lower ribs. Avoid leaning backward excessively. Pause briefly while squeezing your shoulder blades, then return the weight under control. This exercise also improves posture and overall pulling strength.
Target Muscles (Primary)
1. Rhomboids
They experience the highest level of activation.
They work to squeeze the shoulder blades backward.
They build thickness and strength in the upper back.
2. Middle Trapezius
Helps bring the shoulder blades together (retraction).
Develops better posture and upper back thickness.
3. Latissimus Dorsi (Middle & Lower Lats)
The lats undergo contraction, especially during medium and close-grip rows.
Improves back width and pulling strength.
4. Rear Deltoids
Targets the rear portion of the shoulders.
Aids in shoulder stability and balanced upper body development.
Secondary Muscles

These muscles also assist in the movement:
1 Lower Trapezius
2 Teres Major
3 Biceps Brachii
4 Brachialis
5 Brachioradialis (Forearms)
6 Erector Spinae (Lower Back Stabilizer)
7 Core Muscles
3. Bent-Over Barbell Row
As the name suggests, the 'bent-over row' involves performing a rowing movement while bent over—using either dumbbells or a barbell—which is why it is called the bent-over row.
The Bent-Over Barbell Rowis one of the most powerful compound exercises for the upper and middle back. It trains multiple muscles in a single movement and helps increase back thickness, strength, and overall size.
Primary Target Muscles
1. Latissimus Dorsi (Middle & Lower Lats) The lats work to pull the elbows close to the body during the movement. They help make the back wider and thicker.
2. Rhomboids They squeeze the shoulder blades back and together. They improve upper back thickness and posture.
3. Middle Trapezius Retracts the scapula (shoulder blades). Develops a strong and dense upper back.
4. Rear Deltoids Strengthens the rear part of the shoulders. Enhances shoulder stability during pulling movements.
5. Teres Major Works with the lats to pull the arm toward the body. Contributes to back width and pulling strength. in short
Bent-over barbell rows target multiple upper back muscles while increasing overall strength. Bend at the hips with a straight back, hold the barbell with an overhand grip, and pull it toward your lower chest. Lower the weight slowly to maintain muscle tension. Keep your core engaged throughout the movement.
4. Face Pull
In a face pull, we pull a rope or cable towards our face—hence the name—and it is considered an exercise that involves highly controlled movement. achieving optimal muscle activation and effectively targeting the intended muscles depends on maintaining good posture. You should perform this exercise while keeping your body stationary and avoiding any extraneous movement.
The Face Pull is one of the most effective isolation exercises for upper back and shoulder health. This exercise improves posture, stabilizes shoulder joints, and strengthens the upper back muscles along with the rear delts.

Primary Target Muscles
1. Rear Deltoids (Posterior Delts) The rear deltoids are the primary target of the face pull. They make the back of the shoulders strong and well-defined.
They aid in balanced shoulder development.
2. Rhomboids They squeeze the shoulder blades backward. They improve upper back thickness and posture.
3. Middle Trapezius It retracts the shoulder blades. It makes the upper back stable and stronger.
4. Lower Trapezius It keeps the scapula downward and stable. It makes shoulder movement smooth and safe.
Secondary Muscles These muscles assist in the movement: -- Rotator Cuff Muscles (Infraspinatus & Teres Minor)
-- Upper Trapezius
-- Rear Shoulder Stabilizers
-- Biceps
-- Forearms Core Muscles
In short
Face pulls strengthen the rear shoulders, traps, and rhomboids while improving shoulder stability. Attach a rope to a cable machine at face level and pull it toward your face with elbows flared. Squeeze your upper back at the end of each repetition. This exercise is excellent for correcting poor posture.
5. Chest-Supported Row
Chest-Supported Row – Muscles Worked & Exercise Explanation
The chest-supported row See Alsois an effective upper-back exercise that minimizes stress on the lower back thanks to the chest support. This movement isolates the upper and middle back muscles, allowing for better muscle activation and the maintenance of controlled form.
Primary Target Muscles
1. Rhomboids
The rhomboids are the primary target of the chest-supported row.
They retract the shoulder blades, increasing upper-back thickness and strength.
2. Middle Trapezius
The middle traps retract the shoulder blades.
This exercise helps build a dense, muscular upper back.
3. Latissimus Dorsi (Middle Lats)
The lats pull the elbows toward the body.
This improves back width and overall pulling strength.
4. Rear Deltoids
The rear delts assist with shoulder extension during the movement.
They contribute to shoulder balance and stability.
5. Teres Major
Working alongside the lats, the teres major pulls the arm toward the body.
It enhances overall upper-back strength.
Secondary Muscles
These muscles support the movement: 1 Lower Trapezius
2 Biceps Brachii
3 Brachialis
4 Brachioradialis (Forearms)
5 Rotator Cuff Muscles
6 Core Muscles (Stabilization)
Note: Since the chest is supported against the bench, lower back (erector spinae) involvement is significantly lower compared to the bent-over row. Send feedback
The chest-supported row minimizes lower back strain while isolating the upper back muscles. Lie face down on an incline bench and row dumbbells or machine handles toward your body. Pause at the top to contract your shoulder blades before lowering slowly. It is ideal for beginners and experienced lifters alike.
6. T-Bar Row
T-Bar Row – Muscles Worked & Exercise Explanation
The T-Bar Row is a powerful compound back exercise that is highly effective for increasing the thickness, strength, and muscle mass of the upper and middle back. Along with the lats, this exercise intensely targets the rhomboids, trapezius, and rear deltoids, giving the back a dense and muscular appearance.
Primary Target Muscles
1. Latissimus Dorsi (Lats)
The lats are the primary target of the T-Bar Row.
They increase back width and pulling strength.
The lats do the bulk of the work in pulling the elbows toward the body.
2. Rhomboids
Rhomboids squeeze the shoulder blades back and together.
They make the upper back thick and strong.
3. Middle Trapezius
The middle traps are responsible for shoulder blade retraction.
They give the upper back a dense and powerful appearance.
4. Rear Deltoids
Rear delts assist in the pulling movement.
They aid in shoulder stability and balanced shoulder development.
5. Teres Major
The teres major works with the lats to strengthen the pulling movement.
It contributes to increasing overall back thickness.
T-Bar Row
Secondary Muscles
These muscles support the movement:
1 Lower Trapezius
2 Erector Spinae (Lower Back)
3 Biceps Brachii
4 Brachialis
5 Brachioradialis (Forearms)
6 Core Muscles
7 Glutes
8 Hamstrings
Muscle activation during the movement
Starting Position
Stand in a hip-hinge position.
Place your chest on the support pad (if using a chest-supported machine) or keep your back neutral.
Keep your arms fully extended.
Pulling Phase
Pull the handle toward your lower chest or upper abdomen while keeping your elbows close to your body.
The lats generate the pulling force.
The rhomboids and middle traps squeeze the shoulder blades together. Complete the movement for the rear delts and biceps.
End Position
Bring the handle close to your body and squeeze for one second.
Fully contract your shoulder blades.
Lower the weight slowly while maintaining tension on the muscles.
The T-bar row is a powerful compound exercise that builds upper back thickness and strength. Keep your chest supported or maintain a strong hip hinge while pulling the handle toward your chest. Avoid jerking the weight. Slow, controlled repetitions maximize muscle activation and reduce the risk of injury.
7. Reverse Pec Deck Fly
Reverse Pec Deck Fly – Muscles Worked & Exercise Explanation
The Reverse Pec Deck Fly See Alsois an excellent isolation exercise that targets the rear deltoids (posterior shoulders) and upper back muscles. This exercise improves shoulder stability, enhances posture, and gives the upper back a balanced, defined, and muscular appearance.
Primary Target Muscles
1. Rear Deltoids (Posterior Delts
The rear deltoids are the primary target of the Reverse Pec Deck Fly.
They strengthen and define the back of the shoulders.
They are crucial for balanced shoulder development.
2. Rhomboids
The rhomboids squeeze the shoulder blades backward and together.
They improve upper back thickness and posture.
3. Middle Trapezius
The middle trapezius assists in the retraction of the shoulder blades.
It adds density and stability to the upper back.
4. Lower Trapezius
The lower traps stabilize the scapula.
They ensure smooth and controlled shoulder movement.
Secondary Muscles These muscles support the movement: 1 Teres Minor
2 Infraspinatus (Rotator Cuff)
3 Teres Major
4 Upper Trapezius
5 Forearms (Grip)
6 Core Muscles (Stabilization)
Note: The lats (Latissimus Dorsi) play a minimal role in the Reverse Pec Deck Fly. The primary focus of this exercise is on the rear delts and upper back muscles.
This machine exercise effectively isolates the rear deltoids and upper back muscles. Sit facing the machine, grab the handles, and move your arms outward in a wide arc. Squeeze your shoulder blades together before returning to the starting position. Use moderate weight for better control and muscle engagement.
8. Single-Arm Dumbbell Row
The single-arm dumbbell row is a highly effective unilateral exercise that trains one side of the body at a time. This exercise provides deep contraction to the lats, rhomboids, and trapezius muscles. Additionally, it helps correct strength imbalances between the left and right sides.
Primary Target Muscles
1. Latissimus Dorsi (Lats)
The lats are the primary target of the single-arm dumbbell row.
They increase back width and pulling strength.
Pulling the elbow towards the hip effectively activates the lower and middle lats.
2. Rhomboids
The rhomboids squeeze the shoulder blades back and together.
They improve upper back thickness and posture.
3. Middle Trapezius
The middle traps retract the scapula.
They give the upper back a dense, muscular appearance.
4. Teres Major
Working alongside the lats, the teres major pulls the arm towards the body.
It contributes to pulling strength and back development.
5. Rear Deltoids
The rear delts assist with shoulder extension during the movement.
The single-arm dumbbell row improves muscle balance by working each side independently. Place one knee and hand on a bench, keep your back flat, and pull the dumbbell toward your hip. Lower it slowly while maintaining control. Concentrate on squeezing your upper back rather than using your arm strength.
9. Pull-Ups
Pull-ups are among the most effective bodyweight compound exercises. This exercise is highly popular for increasing back width, upper body strength, and grip power. While pull-ups primarily target the lats, various muscles in the upper back, shoulders, and arms also work together during the movement.
Pull-Ups
Pull-ups are a challenging bodyweight exercise that builds upper back strength, grip, and endurance. Hang from a pull-up bar with an overhand grip and pull your chest toward the bar. Lower yourself slowly until your arms are fully extended. Beginners can use an assisted pull-up machine or resistance bands.
10. Machine High Row
The Machine High Row is a compound pulling exercise that effectively targets the upper lats, rhomboids, trapezius, and rear deltoids. The pulling angle runs from high to low, placing greater tension on the upper lats and upper back. The machine's fixed path of motion makes it easy for both beginners and advanced lifters to maintain proper form.
Machine High Row
Primary Target Muscles
1. Latissimus Dorsi (Upper & Outer Lats)
The primary targets of the Machine High Row are the upper and outer lats.
They help give the back a wider look and a V-taper appearance.
Pulling the elbows down and towards the body maximizes lat contraction.
2. Rhomboids
The rhomboids squeeze the shoulder blades back and together.
They improve upper back thickness and posture.
The middle trapezius retracts the scapula.
It builds a dense, strong, and muscular upper back.
4. Teres Major
The teres major works alongside the lats to assist in the pulling movement.
It supports back width and strength.
5. Rear Deltoids (Posterior Delts)
The rear delts assist in shoulder extension and the pulling movement.
They improve balanced shoulder development and stability.
The Machine High Row is an excellent compound back exercise that targets the upper lats, upper back, and rear shoulders. Thanks to the machine's fixed movement path, both beginners and advanced lifters can effectively train these muscles while maintaining proper form. This exercise improves both the width and thickness of the back.
The machine high row targets the upper lats, rhomboids, and rear shoulders with excellent stability. Adjust the seat correctly and pull the handles toward your upper chest while keeping your elbows slightly wide. Pause briefly before returning the weight slowly. This movement is easy to learn and highly effective.
11. Wide-Grip Cable Row
Wide-Grip Cable Row – Muscles Worked & Exercise Explanation
The wide-grip cable row is an excellent compound back exercise that improves upper back thickness, posture, and shoulder stability. Due to the wide grip, this exercise places greater emphasis on the rhomboids, middle trapezius, and rear deltoids compared to the standard cable row. It is a highly effective exercise for building a wider and stronger upper back.
Wide-Grip Cable Row
Using a wide attachment shifts more emphasis onto the upper back and rear shoulders. Sit tall, pull the handle toward your upper abdomen, and keep your elbows moving outward. Squeeze your shoulder blades at the end of each repetition before slowly extending your arms. Avoid rounding your back.
12.Dumbell shrug
Dumbbell Shrugs – Muscles Worked & Exercise Explanation Dumbbell shrugs are an isolation exercise that primarily targets the upper trapezius (upper traps). This exercise increases neck and upper back strength, improves shoulder stability, and helps build thick, powerful, and well-defined traps.
Dumbbell shrugs isolate the upper trapezius muscles, helping create a stronger and more defined neck and upper back. Hold a dumbbell in each hand, keep your arms straight, and raise your shoulders as high as possible. Pause briefly before lowering the weights under control without rolling your shoulders.
13. Rack Pull
The rack pull is a powerful compound exercise that serves as a partial-range variation of the deadlift. It is primarily used to develop the upper back, traps, lower back, and grip strength. Due to the ability to handle heavy weights, it is highly effective for increasing muscle size and overall pulling strength.
See Also
Rack pulls strengthen the traps, upper back, and grip while allowing heavier loads than conventional deadlifts. Start with the bar positioned just below knee height, maintain a neutral spine, and lift by driving your hips forward. Lower the bar carefully to protect your back and maximize muscle development.
14. Inverted Row
The Inverted Row is a bodyweight pulling exercise that primarily strengthens the upper back, lats, rhomboids, trapezius, rear deltoids, and biceps. To perform this exercise, lie on your back beneath a bar (such as a barbell, Smith machine, or TRX straps), grasp the bar with a shoulder-width grip, and pull your chest toward the bar while keeping your body straight from head to heel. Squeeze your shoulder blades together at the top of the movement, then slowly lower yourself back down. This exercise is considered excellent for improving posture, increasing grip strength, and preparing for pull-ups. Everyone, from beginners to advanced athletes, can incorporate it into their back training routine.
1. Latissimus Dorsi (Lats) The lats perform the primary pulling action during the Inverted Row. They help increase back width and pulling strength. The lats activate to pull the body toward the bar.
2. Rhomboids The rhomboids squeeze the shoulder blades by pulling them backward. They improve upper back thickness and posture.
3. Middle Trapezius The middle traps play a crucial role in scapular retraction. They stabilize and strengthen the upper back.
4. Rear Deltoids (Posterior Delts) The rear delts assist in the shoulder extension movement. They improve balanced shoulder development and stability.
5. Teres Major Working alongside the lats, the teres major pulls the arm toward the body. It enhances back strength and muscle activation.
Secondary Muscles These muscles also play a role in the movement: 1 Biceps Brachii
2 Brachialis
3 Brachioradialis (Forearms)
4 Lower Trapezius
5 Erector Spinae
6 Core Muscles (Abs & Obliques)
7 Glutes (Body Stability)
The inverted row is an excellent bodyweight exercise for improving upper back strength and posture. Hold a fixed bar, keep your body straight, and pull your chest toward the bar. Lower yourself slowly while maintaining full-body tension. It is suitable for beginners and advanced athletes by adjusting body angle.
Inverted Row Exercise Guide
15. Cable Straight-Arm Pulldown
Cable Straight-Arm Pulldown – Muscles Worked & Exercise Explanation
The Cable Straight-ArPulldown is an isolation exercise that primarily targets the Latissimus Dorsi (Lats). It is highly effective for increasing back width, improving the mind-muscle connection, and directly activating the lats. Since there is minimal involvement of the biceps, the focus remains squarely on the lats.
Primary Target Muscles
1. Latissimus Dorsi (Lats) ⭐⭐⭐⭐⭐
The lats are the primary target of the Cable Straight-Arm Pulldown.
They help give the back a wider, V-shaped appearance.
The lats are responsible for pulling the arms downward and backward.
2. Teres Major ⭐⭐⭐⭐☆
The teres major works alongside the lats during the shoulder extension movement.
It supports back width and upper back development.
3. Lower & Middle Trapezius ⭐⭐⭐⭐☆
The trapezius muscles help stabilize the shoulder blades.
They play a role in maintaining proper posture and controlled movement.

Secondary Muscles These muscles support the movement: 1 Rear Deltoids
2 Rhomboids
3 Serratus Anterior
4 Core Muscles
5 Forearms (Grip)
Note: Bicep activation is minimal in this exercise because there is no movement at the elbow joint. This makes it an excellent exercise for isolating the lats.
The straight-arm cable pulldown targets the upper lats while improving shoulder control and mind-muscle connection. Stand facing a cable machine, keep your arms nearly straight, and pull the bar toward your thighs. Return slowly while maintaining tension. This exercise works well as a finishing movement after rows.
Thursday, July 16, 2026
Lower Back Exercises in Gym: Complete Beginner Guide
Lower Back Exercises in Gym: Complete Beginner Guide
Here We are describing Lower Back Exercises in Gym: Complete Beginner. When we are at the gym—specifically when we bend down to make entries in the logbook or straighten back up—the lower back is the area that bears the most strain. Training the lower back is crucial, and there are many exercises we can perform at the gym for this purpose. Here, we will discuss some of these exercises, but first, let us understand what the lower back actually is.
Lower back exercises are performed to strengthen the muscles of the lower back. The lower back plays a crucial role in supporting the spine, maintaining posture, and facilitating daily activities such as walking, standing, sitting, and lifting weights. Regular lower back exercises strengthen muscles like the erector spinae, multifidus, glutes, and hamstrings, thereby reducing the risk of back pain and improving body stability.
One hand Seated cable row
lower back exercise
Exercises such as back extensions, deadlifts are effective for increasing lower back strength in the gym. However, these exercises must always be performed with proper form and controlled movements, as incorrect technique can increase the risk of injury. A strong lower back not only builds muscle but also improves posture and enhances overall fitness performance.
Lower back exercises in the gym help strengthen the lumbar muscles, improve posture, increase stability and reduce the risk of injuries. The lower back works with the glutes, hamstrings and core muscles to support almost every movement of the body.
Anatomy of Lower Back Muscles
- Erector Spinae: Helps spinal extension, posture and movement.
- Multifidus: Deep muscles responsible for spinal stability.
The multifidus is one of the deep stabilizing muscles of the lower back and spine, spanning small segments along the back of the vertebrae. This muscle helps maintain spinal stability by connecting one vertebra to another. Its primary functions include ensuring spinal stability, controlling posture, and managing rotation and minor movements.
The multifidus is engaged during lower back exercises such as the Bird Dog, back extension, and deadlift. Strengthening it enhances lumbar stability, may reduce the risk of lower back pain, and provides better spinal support when lifting heavy weights.
Barbel Machine Rowing
- Quadratus Lumborum: Supports side bending and lumbar stability.
- Glutes and Hamstrings: Assist in hip extension and posterior chain strength.
The Erector Spinae is a group of key muscles in the lower back that run like long bands along both sides of the spine. It comprises the Iliocostalis, Longissimus, and Spinalis muscles.
Its primary functions include keeping the spine upright, facilitating backward bending (back extension), maintaining posture, and supporting the spine while lifting heavy weights.
Exercises such as Back Extensions, Deadlifts ,Type of deadlifts See Also, and Good Mornings help strengthen the Erector Spinae. This strengthens the lower back, improves posture, reduces the risk of injury, and makes daily movements easier.

The Quadratus Lumborum (QL) is a deep muscle in the lower back, situated on both sides of the waist between the spine and the pelvis. This muscle connects the 12th rib, the lumbar spine, and the hip bone (iliac crest).
Its primary functions include keeping the body upright, facilitating side-bending, stabilizing the pelvis, and maintaining balance while walking or standing.
The Quadratus Lumborum is engaged during lower back exercises such as the Side Plank, Deadlift, and Back Extension. Strengthening it enhances lower back stability, improves posture, helps reduce imbalances between the hips and waist, and can lower the risk of injury.
The glutes and hamstrings are crucial lower-body muscles that play a significant role in lower back and hip movement. The glutes (Gluteus Maximus, Medius, and Minimus) are among the body's largest muscles, aiding in hip extension, stability, and forward propulsion.
The hamstrings are a group of muscles located at the back of the thigh that facilitate knee bending and hip extension. In lower back exercises such as the Deadlift, Romanian Deadlift, Good Morning, and Back Extension execises, these muscles work in conjunction with the Erector Spinae. Strengthening them enhances posterior chain strength, improves posture, reduces strain on the lower back, and boosts lifting performance.
Benefits of Lower Back Training
lat pulll down
Training the lower back is essential for improving the body's strength, posture, and daily movements. The lower back comprises muscles such as the Erector Spinae, Multifidus, and Quadratus Lumborum, which serve to support and stabilize the spine. Strengthening these muscles helps maintain proper posture and reduces unnecessary strain on the lower back.
Lower back exercises—such as deadlifts, back extensions, the entire posterior chain (lower back, glutes, and hamstrings). For instance, whether lifting heavy weights at the gym or objects at home, a strong lower back enables proper lifting technique and minimizes the risk of injury.
Furthermore, lower back training is beneficial for individuals who spend long periods sitting. Sitting for 8–9 hours in an office setting, for example, can lead to poor posture and lower back stiffness. Regular lower back exercises enhance spinal stability and improve flexibility.

- Prevents lower back injuries and strains.
- Improves posture and spinal stability.
- Enhances athletic performance.
- Improves functional strength for daily activities.
- Creates balanced muscular development.
Best Lower Back Exercises in Gym
1. Back Extensions (Hyperextensions)
Back Extensions are an excellent exercise for strengthening the lower back, glutes, hamstrings, and core muscles See Also. They are commonly performed on a hyperextension bench by bending at the hips and then raising the upper body until it aligns with the legs. This movement helps improve spinal stability, posture, and overall lower back strength, making everyday activities like lifting, bending, and standing easier. Back Extensions also reduce the risk of lower back injuries by strengthening the muscles that support the spine. To stay safe, avoid excessive arching at the top of the movement and perform each repetition slowly with controlled form.
Target Muscles: Erector spinae, glutes, hamstrings.
Equipment: Hyperextension Bench.

How To Perform:
- Place your hips comfortably on the hyperextension bench.
- Keep your spine neutral and lower your upper body slowly.
- Raise your torso while squeezing your glutes.
- Avoid excessive back bending at the top.
Recommended: 3-4 sets × 12-15 repetitions.
2. Deadlifts
Deadlifts are one of the best compound exercises for building total-body strength. They mainly target the lower back, glutes, hamstrings, and core while also engaging the upper back and grip. Maintaining a neutral spine and lifting with proper form helps improve posture, functional strength, athletic performance, and reduces the risk of injuries.
See AlsoTarget Muscles: Lower back, glutes, hamstrings, traps and forearms.

How To Perform:
- Stand with feet hip-width apart.
- Keep chest up and spine neutral.
- Lift the bar by pushing through your heels.
- Lower the weight slowly with control.
Important: Always maintain proper form because incorrect deadlift technique can increase injury risk.
Frequently Asked Questions (FAQs)
1. Is deadlift good for lower back?
Yes. Deadlifts strengthen the lower back, glutes, hamstrings, and core when performed with proper form.
2. Can beginners train lower back?
Yes. Beginners should start with bodyweight back extensions and light resistance before progressing to heavier exercises.
3. How many times a week should I train lower back?
Training the lower back 2–3 times per week is generally enough for most people.
4. Which exercise is best for lower back?
Back extensions, deadlifts, rack pulls, and bird dogs are among the best exercises for building lower back strength.
5. Can lower back exercises reduce back pain?
Properly performed strengthening exercises may help reduce lower back pain by improving spinal stability and muscle strength.
3. Cable Pull Throughs
Cable Pull Throughs are a great lower-body exercise that targets the glutes, Hamstring Muscles, and lower back while also engaging the core. Using a low cable pulley with a rope attachment, stand facing away from the machine and pull the rope through your legs. Hinge at your hips, then drive them forward to return to a standing position. This exercise improves hip strength, posture, and overall posterior chain development. Cable Pull Throughs are beginner-friendly, place less stress on the spine than heavy deadlifts, and help enhance athletic performance and lower back stability when performed with proper form.

- Stand facing away from the cable machine.
- Hold the rope between your legs.
- Perform a hip hinge movement.
- Squeeze glutes while returning upward.
4. Rack Pulls
Rack Pulls are a strength-building exercise that focuses on the upper portion of the deadlift. The barbell is placed on safety pins or blocks just below or above the knees, reducing the range of motion. This exercise primarily targets the lower back, glutes, hamstrings, traps, and upper back while allowing you to lift heavier weights than a regular deadlift. Rack Pulls help improve pulling strength, grip, posture, and overall posterior chain development. Keep your back straight, brace your core, and avoid jerking the bar to reduce the risk of injury and maximize muscle activation

Rack Pull Exercise Guide-Musclewiki
- Place barbell on rack pins.
- Maintain straight back position.
- Drive hips forward during lifting.
Lower Back Training Program
- Strength: 4-6 reps × 4-5 sets.
- Muscle Growth: 8-15 reps × 3-4 sets.
- Endurance: 15-20 reps × 3 sets.
- Frequency: 2-3 times per week.
Common Mistakes To Avoid
Many people make mistakes while training the lower back that can increase the risk of injury. The biggest error is lifting heavy weights with improper form, particularly during exercises like deadlifts . Some individuals use excessive weight in an attempt to progress quickly, placing undue strain on the spine. Starting a workout without warming up is another common mistake. Many people focus solely on the lower back while ignoring the glutes and hamstrings, even though these muscles provide essential support to the lower back. Proper technique, controlled movements, and a gradual increase in weight are crucial for achieving better results.
- Rounding the spine during exercises.
- Using excessive weight.
- Ignoring core activation.
- Training lower back too frequently.
- Neglecting glutes and hamstrings.
Additional Tips For Lower Back Health
- Warm up before heavy lifting.
- Improve hip and hamstring flexibility.
- Maintain correct sitting posture.
- Increase weight gradually.
- Take proper sleep and recovery.
Conclusion
Lower back exercises are important for strength, posture and injury prevention. Exercises like deadlifts, back extensions, rack pulls and supermans help develop a strong posterior chain. Always focus on proper technique, controlled movement and progressive overload for long-term results.